3D Product Rendering: What It Is, Benefits for Brands, and How to Use It
Content Creation
Updated on February 14, 2025
3D product rendering is a new technology revolutionizing e-commerce and digital marketing. This technique brings products to life with beautiful and detailed product images.
In this article, we’ll explore what 3D product rendering is, how it can benefit your brand, and how to use 3D and CGI within your product communication.
What is 3D Product Rendering?
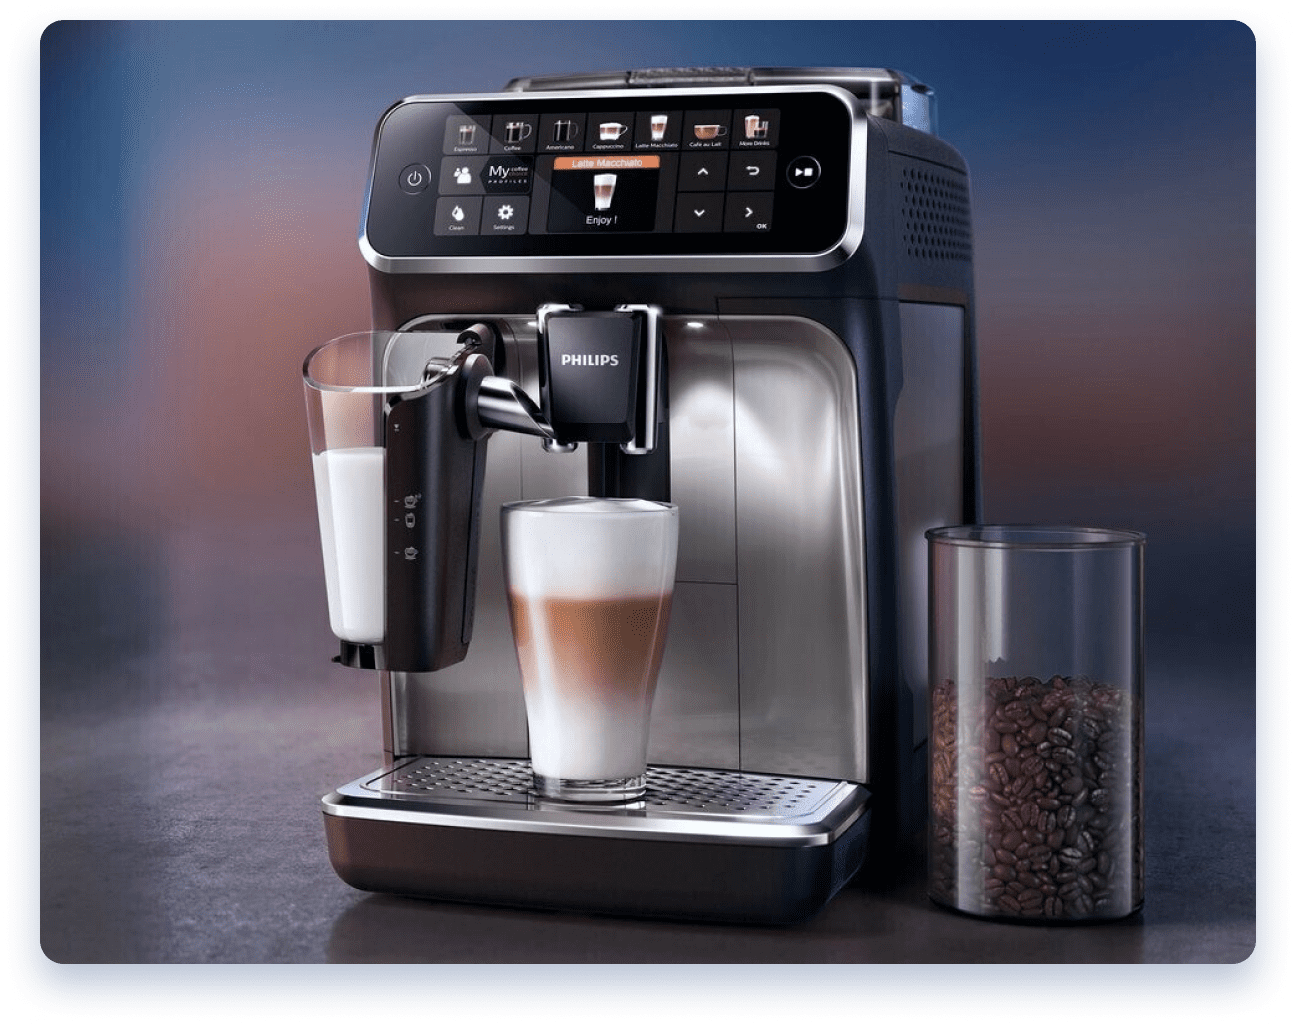
Product 3D rendering takes 3D models and converts them into photorealistic 2D pictures. Rendering uses advanced computer graphics to create detailed and lifelike representations of products.
Many brands now use this technique to create highly detailed product images and help customers make informed purchasing decisions.
The Difference Between 3D Rendering and Product Photography
The key difference between 3D rendering and traditional product photography lies in the creation process and flexibility. Product photography captures products using cameras, requiring physical samples and often extensive setup.
In contrast, 3D rendering is a computer-generated process, creating lifelike images from digital models. Also known as computer-generated imagery (CGI), these graphics can be generated without the need for samples.
3D Modeling vs. 3D Rendering
3D modeling and 3D rendering are two distinct phases. 3D modeling constructs the basic three-dimensional digital representation of an object or surface, essentially a digital version of a product.
On the other hand, a 3D product render generates a lifelike image. It adds textures, setting, and lighting to the 3D model. This process creates a final image that’s rich in detail and realism. It’s perfect for many applications and is a great way to scale the creation of product images.
The Benefits of 3D Product Renders
3D product renders are a huge topic in e-commerce, for several reasons. One of the primary advantages of this technique is its ability to create customized product images at a scale not possible with traditional photography.
3D renders present models in photorealistic detail, with precise textures, dimensions, and reflections. This level of realism helps brands clearly and accurately represent their products, which is key for overcoming buyer hesitation and reducing return rates.
Another advantage of 3D rendering is how it significantly reduces costs. Common fees associated with traditional photography, such as location rentals, shipping involved with physical prototypes, and the logistics of photoshoots are not incurred with rendering.

Moreover, renders offer unparalleled flexibility. Brands can easily update or modify product visuals in response to market demands without new photoshoots. This adaptability is crucial in today’s fast-paced market, where trends and consumer preferences constantly change.
Another remarkable benefit of 3D product rendering is the ability to customize and personalize. Brands can tailor product visuals to suit different customer segments or create various scenarios in which the product might be used.
This customization makes the customer experience more interactive and engaging. Customers can see products in various colors, styles, or settings, which allows them to make better decisions.
Applications of 3D Product Rendering
There are several applications of 3D renders that many brands use. When used to create product images, rendering helps customers see realistic representations of products, reducing the uncertainty often associated with online shopping.
Additionally, rendering often plays a crucial role in product development. It enables brands to create and refine prototypes digitally. It provides an efficient pathway to visualize and adjust product designs before they reach production, ultimately leading to better performance.
Here are some examples of 3D product rendering in e-commerce:
3D Rendering Use Cases

Product images
CGI models for use in videos
Product development
Product design
How to Implement 3D Product Rendering in Your E-Commerce Strategy
Incorporating 3D product rendering into your marketing strategy requires a thoughtful approach, so we broke it down into a step-by-step guide.
Step 1 – Choose a Rendering Method
The first step is to choose a rendering method. Your selection should depend on several factors, like the complexity of your products, the desired level of realism, and your marketing goals.
There are various rendering techniques, each with unique strengths. For instance, ray tracing offers high levels of realism, ideal for luxury products. At the same time, rasterization can be more efficient for simpler models.
Also consider the latest advancements like real-time rendering, which is excellent for interactive experiences. Assess these methods in the context of your product line and customer expectations.
The right choice ensures visually appealing renders that align with your brand’s identity and marketing strategy.
Step 2 – Outsource or In-House?
The next step is to decide how you will create the 3D product renderings. This is a strategic decision and the implications should not be overlooked.
Outsourcing to a specialized agency can bring expertise and high-quality results without your company investing in expensive software or training. It’s a time-efficient and scalable option, especially for companies without a team of 3D designers.
In contrast, in-house production gives you more control. But this requires significant investment in technology and skilled personnel, and you need a way to ensure your content is published on time.
For several reasons, outsourcing product 3D rendering is often more practical for many companies. It eliminates the need for significant upfront investment in specialized software and hardware.
This approach also skips the tough learning curve and time required to train or hire skilled 3D artists, allowing companies to focus on their main strengths.
Professional rendering agencies bring expertise and experience, ensuring high-quality results that might be challenging to achieve in-house. Additionally, outsourcing offers scalability and flexibility, enabling businesses to manage varying workloads without the cost of a full-time team.
This efficiency and cost savings make outsourcing a top choice for companies using 3D rendering.
Step 3 – Hire the Right Designers
Top-notch 3D designers are critical for impactful product visualizations. Whether you decide to create models in-house or outsource production, you should look for experts with strong portfolios that showcase a range of styles and a proven track record.
Technical skill is paramount, but the ability to understand and interpret your brand’s vision and aesthetic is equally important. A good designer should also be adept at using the latest 3D software and staying updated with industry trends.
Additionally, consider their problem-solving skills and ability to work under tight deadlines, as these traits are essential in a fast-paced e-commerce environment.
The right designers can make or break product page performance, and directly impact sales.
Step 4 – Integrate 3D Into Your Existing Workflows
3D product renders can be integrated into your existing marketing workflows with a few practical steps:
- Establish clear communication channels between your 3D design team and other departments, such as marketing, product development, and IT.
- Incorporate milestones into your launch and marketing calendars, allowing sufficient time for rendering processes.
- Leverage project management tools to track progress and facilitate collaboration. Update your content management systems to support and efficiently display 3D visuals.
- Provide training to relevant team members to understand the basics of 3D rendering and build processes into your overall e-commerce strategy.
Step 5 – How to Produce 3D Product Renders
Producing 3D product renders in-house involves several steps, starting with acquiring the right software. A popular option is Blender, a free and versatile open-source 3D modeling software. It’s accessible for businesses of all sizes. You can learn more about Blender and download it from the Blender Project website.
Here’s the basic 3D rendering framework:
1. Conceptualization and Planning: Begin with a clear concept of the product and the desired outcome of the render. Sketch and plan visual aspects, like angles, lighting, and environment.
2. 3D Modeling: Create the model. Attention to detail is crucial. This model forms the basis of your final render.
3. Texturing: Apply textures to your model. Give the model color and detail, such as material appearance, patterns, and specific features.
4. Lighting: Apply virtual lighting. Experiment with different setups to highlight the product’s best features.
5. Rendering: Transform the 3D model into a 2D image. Consider how to set your product in an appropriate scene.
6. Post-Production: Apply any effects that should be added. You can do this in image editing software, where you can adjust colors, contrast, or add additional elements.
7. Review and Revise: Perform quality assurance (QA) checks to ensure the 3D product renders meet the desired standards and make any necessary revisions.
8. Integration: Finally, integrate the renders into your marketing materials, e-commerce platform, and other digital channels.
Before you publish, remember the quality of your 3D renders significantly impacts customer perception and engagement. Have a few people check the final versions before you publish to reduce the chance of mistakes.
How to Produce 3D Product Renders

Conceptualization & planning
Gather reference materials
Create the models
Apply textures
Set up lighting
Take virtual pictures
Render the products
Post-processing
Quality-assurance
Final export
Step 6 – Publish the Renders
After your renders are complete, you need to publish them. Modern 3D technology has evolved so that renders can be almost indistinguishable from real photos, offering realism that greatly enhances the customer experience.
However, before these renders make their way onto your e-commerce platform or marketing materials, it’s imperative to conduct thorough quality assurance (QA) checks.
These QA checks must closely examine every part of the render, from how accurate the product looks to the consistency in lighting and textures.
Even minor errors can affect how people see your product’s quality. Bad 3D product renders can mislead customers and tarnish your brand’s reputation.
The review should involve many stakeholders, like product managers and marketing pros, for a thorough evaluation. Maybe even a focus group of potential customers. It’s essential to make sure the renders match your brand’s look and get your message across effectively.
3D Product Rendering by DemoUp Cliplister
At DemoUp Cliplister, we specialize in providing high-quality, professional 3D product rendering services. Our expertise and cutting-edge technology empower us to produce 3D product renders at a scale and quality that meets the demands of the world’s most renowned brands.
We understand the importance of detail, realism, and brand consistency in digital product visualization, and our team is dedicated to delivering renders that exceed these expectations.
What makes us unique isn’t just our skill in creating amazing 3D visuals. We’re the only 3D product rendering company bundling content creation with practical solutions like digital asset management software and 3D syndication.
This combo publishes your 3D models to top retailers, showcasing your products perfectly online.
With DemoUp Cliplister, you have a partner who understands the intricacies of e-commerce and the importance of compelling product visuals in driving sales and branding.
Don’t just show your products; bring them to life.
Contact us today to see how we can elevate your brand’s online experience and connect with customers like never before.
Wrapping Up
Transform your e-commerce business by embracing the power of 3D product renders. Our unmatched realism and flexibility elevate customer experience and engagement to new heights. For more insights, our blog.
For our full product portfolio, visit our homepage today, and discover how we help the world’s biggest brands bring products to life.
Frequently Asked Questions
Do you still have questions about 3D product rendering? Give this section a read as we answer all the most common queries about e-commerce 3D product renders.
3D product rendering is the process of creating realistic, three-dimensional digital representations of products. It involves modeling, texturing, lighting, and rendering to showcase products visually compellingly.
To produce a 3D render of a product, our team uses 3D modeling software to build a digital model, also known as a wireframe. After the model is done, we apply textures and lighting and render the final image for presentation.
3D product rendering involves creating digital, three-dimensional representations of products using computer software. In contrast, product photography captures physical products through cameras and lighting, resulting in 2D images. Read the dedicated section highlighting the differences to learn more.
3D modeling involves constructing the digital framework, specifying the object’s structure and shape. 3D rendering takes this model, adding intricate details, lighting, and textures to produce visually compelling 2D images or animations, capturing the realistic essence of the virtual creation.
Yes. It’s a lot of work to create 3D models, much less render them afterward. DemoUp Cliplister helps you scale this process so you can deliver excellent presentations for any product right to the point of sale.
Better Content. More Sales.

Fill out the form to discover our end-to-end eCommerce content solutions for brands & shops